Upgrading to a smart thermostat can shave 10-20% off heating and cooling bills, but the installation question stops many homeowners cold: should they DIY or call a pro? The answer isn’t one-size-fits-all. Most modern smart thermostats are designed for straightforward swap-outs using existing low-voltage wiring, but certain HVAC systems, missing C-wires, or complex zone setups push the job firmly into electrician territory. This guide breaks down exactly when you can tackle the install yourself, when to hire licensed help, what to expect during a professional installation, and how much it’ll cost in 2026.
Table of Contents
ToggleKey Takeaways
- Smart thermostats can reduce heating and cooling bills by 10-20%, making professional installation worth considering if your HVAC system requires expert wiring or has compatibility issues.
- Most single-stage systems with standard low-voltage wiring can be DIY-installed in 30-45 minutes, but complex systems with multiple zones, heat pumps, or missing C-wires demand an electrician’s expertise.
- Hiring an electrician for smart thermostat installation typically costs $100–$300 in labor (2026), with additional fees for C-wire runs, high-voltage retrofits, or permits that vary by region.
- Licensed electricians should test transformer output, inspect HVAC compatibility, and guarantee their work—avoid unlicensed technicians who skip system assessment or offer vague pricing.
- High-voltage systems like electric baseboard heaters cannot use standard smart thermostats without a relay or transformer, requiring permits and professional installation per electrical code.
When You Can Install a Smart Thermostat Yourself
Most single-stage heating and cooling systems with accessible low-voltage wiring are fair game for DIYers. If your current thermostat has four or five labeled wires (R, G, Y, W, C) attached to a standard backplate, and you’re replacing it with a model like a Nest or Ecobee, the job typically takes 30-45 minutes with basic tools.
You’ll need:
• Screwdriver (typically Phillips-head)
• Smartphone or tablet for setup
• Needle-nose pliers (optional, for wire stripping)
• Voltage tester (optional but smart, confirms power is off)
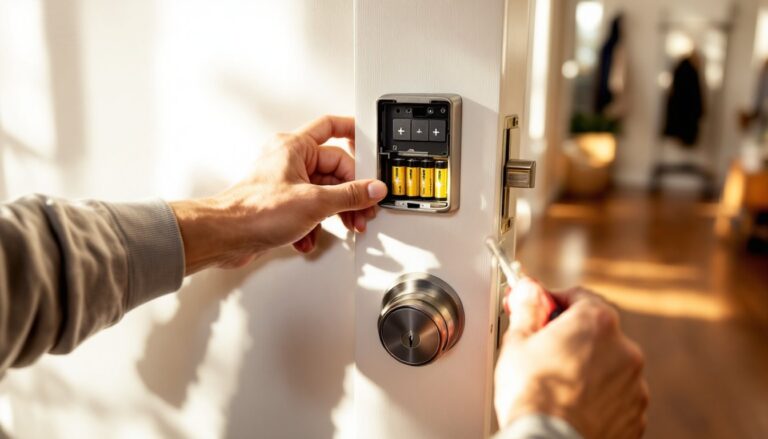
Turn off the breaker controlling your HVAC system before touching any wires. Label each wire with painter’s tape as you disconnect it from the old thermostat. Most smart thermostats include labeled stickers for this exact purpose. Match the wire labels to the new backplate terminals, level and mount the backplate, connect the wires, snap on the thermostat face, and restore power.
The C-wire (common wire) is the wildcard. Older thermostats often didn’t use one because they ran on batteries. Smart thermostats need continuous power for Wi-Fi, touchscreens, and sensors. If you’ve got a C-wire at the wall but it wasn’t connected, attach it to the C terminal. If there’s no C-wire in the bundle, many kits include a power extender kit (PEK) that pulls power from your furnace control board. Installing a PEK involves opening the furnace panel and connecting a small adapter, doable, but it requires comfort working inside the HVAC unit and following wiring diagrams.
Safety note: low-voltage thermostat wiring (typically 24V) won’t shock you the way household 120V circuits can, but always cut power at the breaker. If you’re uncertain about wire identification or furnace-side connections, stop and call a pro.
When to Hire an Electrician for Smart Thermostat Installation
Some situations are red flags for DIY, even for handy homeowners. Complex systems, missing infrastructure, and high-voltage components all justify hiring a licensed electrician or HVAC technician.
Complex Wiring Configurations
Multi-stage HVAC systems, heat pumps with auxiliary heat, or zoned systems (where multiple thermostats control different areas) often have eight or more wires and non-standard terminal labels. Heat pumps, for example, add wires for reversing valves (O or B) and auxiliary heat strips (W2, E). Zoned systems may require damper controls and multiple C-wires.
Mismatched wiring can trip safety limits, burn out transformer fuses, or cause the system to heat when it should cool. If your existing thermostat has more than six wires, or if labels don’t match standard conventions, an electrician can trace circuits, confirm compatibility with your chosen smart thermostat, and handle any required rewiring. This is especially true for older systems with proprietary wiring or mechanical thermostats that used line-voltage (120V/240V) switching, those require a complete low-voltage retrofit.
High-Voltage Systems and HVAC Compatibility Issues
Electric baseboard heaters, radiant ceiling panels, and some older wall heaters run on line voltage (120V or 240V), not the 24V used by most forced-air systems. Standard smart thermostats aren’t compatible with line voltage without a relay or transformer setup, which is electrical work requiring permits in many jurisdictions per NEC (National Electrical Code) standards.
If you’re unsure whether your system is low or high voltage, check the existing thermostat. Line-voltage models are usually bulkier, with thicker wires (14- or 12-gauge Romex), and they control power directly rather than signaling a control board. Installing smart control in these setups often means adding a contactor or isolation relay, definitely electrician territory.
Compatibility issues also crop up with older HVAC equipment that lacks a C-wire terminal at the furnace or air handler. Running a new C-wire from the equipment to the thermostat involves fishing wire through walls or conduit, which many homeowners prefer to outsource. Some systems, particularly those with power-stealing thermostats or millivolt gas valves (common in older gas furnaces and fireplaces), won’t supply enough current for a smart thermostat without adding a 24V transformer. That’s another job for someone with electrical licensing.
What to Expect When Hiring an Electrician
A licensed electrician (or HVAC tech with electrical certification) will start with a system assessment. Expect them to:
- Inspect your current thermostat and HVAC equipment to confirm wiring, voltage, and compatibility.
- Check for a C-wire or determine if one needs to be run from the furnace/air handler.
- Test the transformer output at the furnace to ensure it can handle the additional load of a smart thermostat (most are 40VA transformers: Ecobees and Nests typically draw 4-8 watts).
- Install the new thermostat, including any necessary add-ons like power extender kits, isolation relays, or new transformers.
- Configure and test the system, cycling through heat, cool, and fan modes to confirm proper operation.
The whole process usually takes 1-2 hours for a straightforward swap or C-wire install. If they need to run new wire through finished walls or retrofit a high-voltage system, budget 2-4 hours. Licensed electricians carry liability insurance, pull permits when required (check local codes, some municipalities require permits for any wiring changes), and guarantee their work, which is worth the cost if anything goes sideways.
Ask whether they’ll handle the smart thermostat’s Wi-Fi setup and app configuration. Some pros include it: others expect you to handle the software side after they’ve wired everything. Clarify that upfront to avoid confusion.
Cost Breakdown and Factors That Affect Pricing
As of 2026, professional smart thermostat installation costs typically run $100–$300 for labor, not including the thermostat itself. Here’s how pricing breaks down:
Standard installation (existing compatible wiring, simple swap): $100–$150. This covers an electrician’s time to disconnect the old unit, mount the new one, and test the system.
C-wire installation: Add $100–$200 if the electrician needs to run a new 18/5 or 18/8 thermostat cable from the HVAC unit to the wall. Cost varies with wire run length and wall access. Fishing wire through finished drywall costs more than running it in an unfinished basement.
High-voltage retrofit or relay installation: $200–$400+. Converting a line-voltage system to work with a smart thermostat involves adding a contactor, isolation relay, or step-down transformer, plus the labor to wire and test it. Permits may be required, adding another $50–$150 depending on your jurisdiction.
Thermostat cost: Budget $120–$250 for the device itself. Popular models in 2026 include the Google Nest Learning Thermostat (around $220), Ecobee SmartThermostat Premium ($200-$230), and Honeywell Home T9 ($140-$180). Higher-end units with room sensors, better touchscreens, or advanced automation features cost more.
Regional variation is real. Electricians in metro areas or high-cost-of-living regions (San Francisco, New York, Boston) may charge $150–$200/hour, while smaller markets see rates closer to $75–$125/hour. Get multiple quotes, most electricians offer free estimates. Services like Angi can help compare local rates and read reviews.
How to Choose the Right Electrician for Your Smart Thermostat Project
Not all electricians specialize in HVAC controls, and not all HVAC techs are licensed for electrical work. For smart thermostat installation, look for:
Licensing and insurance: Verify the electrician holds a valid state or local license (requirements vary, most states require a journeyman or master electrician license for paid work). Ask for proof of liability insurance. If they’re working inside your HVAC system, confirm they’re comfortable with low-voltage controls and furnace wiring.
Experience with smart home devices: An electrician who’s installed dozens of Nests or Ecobees will troubleshoot compatibility issues faster than someone seeing their first Wi-Fi thermostat. Ask how many smart thermostats they’ve installed in the past year.
Transparent pricing: Get a written estimate that itemizes labor, materials (wire, connectors, relays), and any permit fees. Avoid vague “we’ll see when we get there” pricing. Flat-rate quotes are common for thermostat installs because the scope is predictable.
Reviews and references: Check online reviews and ask for references from recent jobs. For smart home tech reviews and compatibility checks, resources like CNET offer detailed breakdowns of which thermostats work best with different HVAC setups.
Warranty on labor: Reputable electricians offer at least a 30-day warranty on workmanship. If the system fails due to wiring issues within that window, they’ll return to fix it at no charge.
If you’re replacing an older thermostat in a home built before 2000, mention it upfront. Older systems are more likely to need C-wire runs, transformer upgrades, or compatibility workarounds, and an experienced pro will budget time accordingly. Don’t hesitate to get 2-3 quotes, especially if the first estimate includes unexpected add-ons like rewiring or system modifications.