Installing an outdoor smart outlet isn’t just about convenience, it’s about taking control of your exterior lighting, holiday decorations, pool equipment, and landscape features from your phone or voice assistant. These weatherproof devices bring the same automation you’ve enjoyed indoors to patios, decks, gardens, and garages. But unlike their indoor counterparts, outdoor smart outlets face rain, snow, UV exposure, and temperature swings, which means choosing the wrong model can lead to failures, safety hazards, or code violations. This guide walks through everything a homeowner needs to know: how these outlets work, what features matter, installation steps, and practical uses that make the investment worthwhile.
Table of Contents
ToggleKey Takeaways
- An outdoor smart outlet enables remote control and automation of exterior lighting, decorations, and equipment via app or voice assistant, requiring proper weatherproofing rated IP65 or higher for reliable protection against rain and moisture.
- Installation takes 30–45 minutes by replacing an existing outlet with a compatible smart model, but new outdoor circuits typically require a permit and licensed electrician involvement per local electrical codes.
- Choose connectivity wisely: Wi-Fi models offer easiest setup and voice assistant compatibility, while hub-based Zigbee or Z-Wave outlets provide superior range for complex smart home ecosystems.
- Outdoor smart outlets deliver measurable benefits including 15–25% energy savings through automated scheduling, enhanced security with dusk-to-dawn lighting, and remote equipment monitoring that prevents wasted trips outside.
- Successful outdoor smart outlet deployment goes beyond basic lighting by automating seasonal decorations, pool equipment, garden features, and weather-responsive systems that adjust operation based on real-time conditions.
What Is an Outdoor Smart Outlet and How Does It Work?
An outdoor smart outlet is a weatherproof electrical receptacle that connects to a home’s Wi-Fi network, allowing remote control and automation of devices plugged into it. Unlike standard outdoor outlets that simply provide power, smart outlets integrate with apps, voice assistants like Alexa or Google Assistant, and home automation routines.
Most outdoor smart outlets replace existing exterior receptacles in a standard electrical box, though plug-in models also exist that fit into existing outlets. The smart functionality comes from built-in Wi-Fi or Bluetooth radios and microcontrollers that communicate with a companion app. When someone taps “on” in the app, the outlet’s internal relay closes, completing the circuit and delivering power to whatever’s plugged in.
These outlets typically require a neutral wire in the electrical box, older homes may lack one, which can complicate installation. Power ratings vary, but most handle 15 amps at 120 volts, matching standard household circuits. Some models include energy monitoring, showing real-time power consumption in watts or tracking usage over time. Others offer individual control of each receptacle, scheduling features, and integration with IFTTT or other automation platforms.
The housing and cover plate are built to meet NEMA (National Electrical Manufacturers Association) or IP (Ingress Protection) ratings for moisture and dust resistance, more on that shortly. Installation requires turning off power at the breaker, verifying wires with a non-contact voltage tester, and following local electrical codes. In many jurisdictions, replacing an outlet is considered a minor repair that homeowners can perform, but adding a new outdoor circuit usually requires a permit and should be handled by a licensed electrician.
Key Features to Look for in an Outdoor Smart Outlet
Not all outdoor smart outlets are created equal. Choosing the right one depends on climate, the devices being controlled, and how the outlet fits into an existing smart home ecosystem.
Weather Resistance and IP Ratings
IP ratings (Ingress Protection) indicate how well an outlet resists dust and water. The rating consists of two digits: the first for solid particle protection (0–6), the second for liquid protection (0–9). For outdoor use, look for at least IP65, which means dust-tight and protected against water jets from any direction. IP66 or IP67 ratings offer even better protection against heavy rain or temporary submersion.
Some manufacturers use NEMA ratings instead. NEMA 3R is the minimum for outdoor outlets, providing protection against rain and sleet. NEMA 4 adds resistance to hose-directed water, while NEMA 4X includes corrosion resistance for coastal environments.
The outlet cover matters as much as the housing. In-use covers (also called “bubble covers”) keep plugs protected even when cords are connected, which is critical if the outlet powers something continuously. Spring-loaded or hinged covers that seal tightly prevent moisture from creeping into the outlet during storms.
Temperature tolerance is another consideration. Quality outdoor smart outlets operate reliably from -4°F to 122°F or wider. UV-resistant plastic housings prevent brittleness and cracking after years of sun exposure. Metal faceplates may corrode in salty or high-humidity climates unless they’re stainless steel or powder-coated.
Smart Home Compatibility and Connectivity
Connectivity options fall into three categories: Wi-Fi, Bluetooth, and hub-based protocols like Zigbee or Z-Wave. Wi-Fi models connect directly to the home network and work with most voice assistants without additional hardware. They’re the most common and easiest to set up, but they depend on strong outdoor Wi-Fi signal strength. If the router is on the opposite side of the house, expect connectivity issues.
Bluetooth models require proximity to a phone or tablet for control, which limits automation and remote access. They’re fine for controlling lights on a patio while sitting outside, but they won’t work from the couch or when away from home unless paired with a hub.
Hub-based outlets using Zigbee or Z-Wave offer better range through mesh networking, where each device extends the signal to others. They require a compatible hub (like SmartThings, Hubitat, or a voice assistant with built-in hub functionality), but they’re more reliable in complex smart home setups.
Check compatibility with the voice assistant already in use. Most outlets work with Alexa and Google Assistant, but HomeKit support is less common and often requires a hub. App quality varies, some manufacturers offer clunky interfaces with limited scheduling options, while others integrate smoothly with routines and scenes.
Look for outlets that support individual receptacle control if managing multiple devices from one outlet. Energy monitoring is useful for tracking power-hungry equipment like pool pumps or electric heaters, helping identify inefficiencies or confirming devices turned off.
Top Benefits of Installing Outdoor Smart Outlets
Beyond novelty, outdoor smart outlets solve real problems for homeowners managing exterior spaces and equipment.
Automated lighting schedules eliminate the need to manually turn on porch lights or landscape lighting. Set lights to turn on at dusk and off at dawn, or sync them with local sunset times that adjust seasonally. This improves security by making the home look occupied when traveling, and it prevents leaving lights on all day by mistake.
Holiday decoration control becomes effortless. Instead of crawling behind bushes to plug in string lights every evening, schedule them through the app. Some homeowners set decorations to turn on at 5 PM and off at 11 PM, or sync them with other smart lights for coordinated displays. When the season ends, the outlet is ready for the next use without rewiring.
Energy savings come from eliminating vampire power draw. Devices like outdoor speakers, decorative fountains, or landscape transformers continue drawing power even when idle. Independent testing by CNET reviewers shows that many homeowners reduce outdoor energy use by 15–25% after installing smart outlets and adjusting usage patterns.
Remote control of equipment prevents wasted trips. Turn on a patio heater from inside the house before heading out, or shut off a garage freezer that’s making noise at 2 AM without going outside. If a sump pump or pond aerator is plugged into a smart outlet, check its power draw remotely to confirm it’s running.
Integration with weather-based automation takes convenience further. Pair the outlet with a smart weather service to turn off irrigation systems when rain is detected, or disable misting fans when humidity rises above a threshold. Voice control adds another layer: “Alexa, turn on the grill lights” works from the kitchen while prepping food.
Troubleshooting and notifications help catch problems early. If a smart outlet stops drawing power unexpectedly, the app can send an alert indicating a tripped breaker or failed device. Energy monitoring data helps diagnose issues, if a pool pump suddenly draws 30% more power, it may signal a clog or motor problem.
How to Install an Outdoor Smart Outlet: Step-by-Step Guide
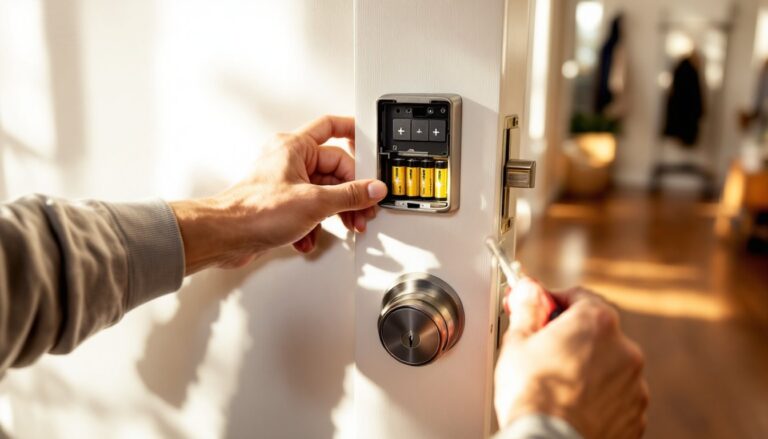
Replacing an existing outdoor outlet with a smart model is a straightforward project for anyone comfortable with basic electrical work. It typically takes 30–45 minutes.
Safety first: Turn off power at the breaker panel. Flip the breaker for the outdoor outlet circuit to the off position, then use a non-contact voltage tester at the outlet to confirm no voltage is present. Outdoor outlets should be on a GFCI-protected circuit per NEC 210.8, either through a GFCI breaker or an upstream GFCI outlet. Wear safety glasses and work gloves.
Gather tools and materials:
- Non-contact voltage tester
- Flathead and Phillips screwdrivers
- Wire strippers
- Needle-nose pliers
- Outdoor smart outlet (verify it fits a standard single-gang box)
- Wire nuts or push-in connectors (if not included)
- Weatherproof cover plate (often included with the outlet)
- Silicone caulk or weatherproof sealant
Step-by-step installation:
-
Remove the old outlet. Unscrew the cover plate, then remove the two screws holding the outlet to the electrical box. Gently pull the outlet forward to expose the wiring. Take a photo of the wire connections before disconnecting anything, this helps if questions arise.
-
Disconnect the wires. Loosen terminal screws or release push-in connections to free the wires. Standard wiring includes a black (hot) wire, white (neutral) wire, green or bare copper (ground) wire, and possibly a second set if the outlet is mid-circuit. Some older boxes may lack a neutral, which prevents most smart outlets from working.
-
Prepare the smart outlet. Read the manufacturer’s wiring diagram, terminal labels vary. Most smart outlets have clearly marked terminals for line (incoming power), load (if controlling downstream devices), neutral, and ground. If the outlet includes a wiring harness with pre-attached leads, strip wire ends to 5/8 inch if not already done.
-
Connect the wires. Attach the ground wire first, twist the outlet’s ground lead together with the ground wire(s) from the box, then secure with a wire nut or connector. Connect the neutral (white) wires next, followed by the hot (black) wires. If the outlet is mid-circuit, use wire nuts to pigtail connections so power continues downstream. Tug each wire gently to confirm solid connections.
-
Secure the outlet. Carefully fold the wires back into the box, ensuring no insulation is pinched. Screw the smart outlet to the box using the provided mounting screws, aligning it level.
-
Seal and cover. Apply a bead of silicone caulk around the perimeter where the outlet meets the siding or exterior wall, preventing water infiltration behind the box. Attach the weatherproof cover plate, ensuring gaskets (if included) sit flush.
-
Restore power and test. Turn the breaker back on. Most smart outlets will power up with an indicator light or sound. Follow the manufacturer’s app instructions to connect the outlet to Wi-Fi, this usually involves pressing a button on the outlet, selecting it in the app, and entering the network password. Test both receptacles with a lamp or other device to confirm proper operation.
Permit considerations: Replacing an existing outlet typically doesn’t require a permit, but local codes vary. If installing a new outdoor circuit or moving an outlet location, consult local building authorities. Work must meet NEC and local amendments, including GFCI protection, proper box depth, and appropriate wire gauge for circuit length and load.
Creative Ways to Use Your Outdoor Smart Outlet
Once installed, outdoor smart outlets unlock a range of uses beyond basic lighting control.
Seasonal decorations: Automate Christmas lights, Halloween displays, or Fourth of July decorations. Schedule them to turn on at specific times and sync with music or other smart lights for coordinated effects. Some homeowners use routines to gradually dim outdoor lights before shutting off, creating a smooth transition.
Landscape and garden automation: Control low-voltage landscape lighting transformers, fountain pumps, or garden water features. Set lights to follow dusk-to-dawn schedules that adjust with the seasons. Pause fountains during freezing weather to prevent damage, or schedule them to run only during waking hours to reduce noise at night.
Outdoor entertainment: Power patio speakers, string lights, or projector setups with voice commands or app control. Create a “movie night” routine that turns on the projector outlet, dims surrounding lights, and starts background music, all with one command.
Pool and spa equipment: Control pool pumps, heaters, or hot tub circulation systems. Energy monitoring helps track operating costs and identify inefficient equipment. Schedule pumps to run during off-peak electricity hours if on a time-of-use rate plan, reducing costs.
Security and deterrence: Randomize outdoor lighting when away from home to simulate occupancy. Pair the outlet with motion sensors or cameras to trigger lights when activity is detected. Some homeowners connect outdoor sirens or strobe lights to smart outlets as part of a DIY security system.
Garage and workshop tools: Control space heaters, fans, or dust collection systems in detached garages or workshops. Turn on a heater 30 minutes before heading out to work, or remotely shut off tools left running by mistake.
Electric vehicle charging: While dedicated EV chargers are preferable, a smart outlet can control a Level 1 charger (standard 120V plug). Schedule charging during off-peak hours, monitor energy usage, and set reminders if the car isn’t plugged in by a certain time.
Weather-responsive automation: Combine the outlet with smart weather services or sensors. Turn off misters when humidity exceeds 70%, disable outdoor fans during high winds, or activate patio heaters when temperature drops below 60°F. Detailed guides for automating outdoor devices often include step-by-step routines for weather-based triggers.
Many smart home enthusiasts integrate outdoor outlets into whole-home automation scenes, “Good Morning” routines that turn off all outdoor lights, or “Leaving Home” scenes that verify all outlets are off before arming security systems. The flexibility depends on the outlet’s compatibility with automation platforms and the user’s willingness to experiment with routines.
With proper installation and thoughtful use, an outdoor smart outlet becomes an invisible but essential part of managing exterior spaces, saving time, energy, and eliminating small frustrations that add up over time.