Installing a Honeywell smart thermostat isn’t just about joining the connected home trend, it’s about taking real control over heating and cooling costs while improving day-to-day comfort. Honeywell’s been in the thermostat business since 1885, and their current smart lineup combines that legacy of reliability with modern features like geofencing, room sensors, and voice control. Whether you’re upgrading from a basic programmable model or replacing a decades-old dial unit, a smart thermostat can trim 10-23% off annual heating and cooling expenses according to EPA estimates. This guide walks through what sets Honeywell’s smart thermostats apart, which models fit different homes, how to install one yourself, and how to squeeze every dollar of savings from the tech.
Table of Contents
ToggleKey Takeaways
- Honeywell smart thermostats can reduce heating and cooling costs by 10-23% annually while offering broad compatibility with Alexa, Google Assistant, Apple HomeKit, and Samsung SmartThings.
- The T9 model excels in multi-room homes with its smart room sensor capability, allowing you to prioritize temperature in specific zones, while the T6 Pro delivers dependable performance at a lower price for simpler setups.
- Most DIY installations take 30-60 minutes; the critical step is identifying or installing a C-wire for continuous 24V power, as most smart thermostats require it for reliable operation.
- Maximize savings by setting 7-10°F setbacks during sleep or work hours, using geofencing strategically, and changing HVAC filters regularly—clogged filters can cut efficiency by 5-15%.
- Monthly energy reports through the Resideo app reveal usage patterns and help catch efficiency problems early, such as open doors or loose ducts that may be wasting energy.
What Makes Honeywell Smart Thermostats Stand Out?
Honeywell smart thermostats earn their place in a crowded market through a combination of broad compatibility, straightforward interfaces, and professional-grade reliability. Unlike some competitors that lock users into proprietary ecosystems, most Honeywell Home models work with Amazon Alexa, Google Assistant, Apple HomeKit, and Samsung SmartThings right out of the box. That flexibility matters when you’re building a multi-platform smart home.
The hardware itself is designed for longevity. Honeywell units typically feature backlit touchscreens with crisp displays readable in direct sunlight or dim hallways. The build quality reflects decades of HVAC industry experience, these aren’t lightweight plastic gadgets that crack during installation. Most models support conventional forced-air systems (gas, oil, electric), heat pumps (including multi-stage and dual-fuel), and even radiant systems, covering roughly 95% of residential HVAC setups.
One standout feature across the lineup is Smart Room Sensor compatibility. The T9 and T10 models can pair with wireless sensors placed in bedrooms, home offices, or other priority spaces, allowing the system to prioritize temperature and occupancy where it matters most instead of relying solely on the thermostat’s location (often a hallway nobody uses). This addresses a common pain point: the upstairs bedroom that’s always too warm while the downstairs thermostat reads a comfortable 72°F.
Honeywell also keeps the software simple. The Resideo app (formerly Honeywell Home) offers scheduling, geofencing, energy reports, and maintenance reminders without burying essential controls under layers of menus. For DIYers who value function over flashy animations, that’s a real advantage. Many expert tested smart thermostats rank Honeywell models highly for their balance of features and usability.
Top Honeywell Smart Thermostat Models to Consider
Choosing the right model depends on your home’s layout, HVAC complexity, and budget. Here are two top performers from Honeywell’s 2026 lineup.
Honeywell Home T9 With Smart Room Sensors
The T9 is Honeywell’s flagship for multi-room comfort. It ships with one smart room sensor and supports up to 20 additional sensors (sold separately at roughly $40 each). Each sensor tracks temperature and occupancy in real time, feeding data back to the thermostat so it can average readings from occupied rooms or prioritize a specific zone.
Key specs:
- Compatibility: Works with most 24V HVAC systems, including heat pumps, dual-fuel, and humidifiers/dehumidifiers.
- Display: 3.5-inch color touchscreen.
- Geofencing: Uses smartphone location to switch between Home and Away modes automatically.
- Voice control: Alexa, Google Assistant, Siri (via HomeKit).
- C-wire: Required for most installations (more on this in the install section).
The T9 shines in homes where room-to-room temperature varies significantly, think two-story layouts, bonus rooms over garages, or older homes with uneven ductwork. It typically retails around $200-$230, with sensors adding to the upfront cost but delivering measurable comfort improvements. Independent testing by leading smart thermostat reviewers frequently highlights the T9’s sensor ecosystem as a differentiator.
Honeywell Home T6 Pro
For a no-frills, contractor-grade option, the T6 Pro delivers dependable performance without the premium price. This model is popular with HVAC professionals for new construction and replacements because it’s simple to wire, configure, and troubleshoot.
Key specs:
- Compatibility: Supports up to 3 heat/2 cool stages, making it suitable for most forced-air and heat pump systems.
- Display: Backlit touchscreen (not color, but highly readable).
- Scheduling: 7-day programming with 4 schedule periods per day.
- Voice control: Alexa and Google Assistant.
- C-wire: Recommended but not always required (depends on system).
The T6 Pro typically runs $120-$150. It doesn’t support room sensors or the fancier geofencing of the T9, but it handles core smart thermostat duties, remote access, scheduling, energy tracking, without fuss. It’s an excellent choice for single-story homes, apartments, or anyone who wants smart features without complexity. Many comprehensive thermostat testing panels recognize the T6 Pro as a solid mid-tier pick for value-conscious buyers.
How to Install Your Honeywell Smart Thermostat
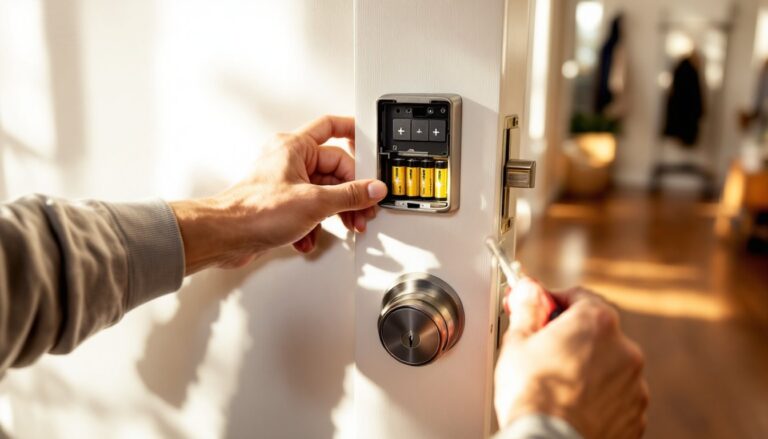
Most homeowners with basic DIY skills can install a Honeywell smart thermostat in 30-60 minutes. You’ll need a screwdriver (usually Phillips), a drill with a 3/16-inch bit (if mounting to drywall without a stud), wire labels (often included), and possibly a C-wire adapter if your system lacks a common wire.
Before you start: Turn off power to your HVAC system at the breaker. Not just at the thermostat, go to the electrical panel and flip the breaker labeled “furnace,” “AC,” or “HVAC.” Use a non-contact voltage tester to confirm the thermostat wires are dead.
Step-by-step installation:
-
Remove the old thermostat. Pull off the faceplate, then unscrew the backplate from the wall. Most thermostats use 18-24 gauge thermostat wire, color-coded by terminal (R for power, W for heat, Y for cooling, G for fan, C for common). Take a photo of the existing wiring before disconnecting anything.
-
Label the wires. Use the stickers included with your Honeywell thermostat or masking tape and a marker. Match each wire to its terminal letter. If you have a jumper wire between R and Rc, note that, you may not need it with the new thermostat.
-
Check for a C-wire. The common wire (usually blue or black, attached to a “C” terminal) provides continuous 24V power. Most smart thermostats, including the T9 and T6 Pro, need it for reliable operation. If your old thermostat didn’t have a C-wire connected, check inside the wall, there’s often a spare wire bundled with the others. If not, you’ll need a C-wire adapter (Honeywell sells one for about $30) or call an HVAC tech to run a new wire from the furnace.
-
Mount the new backplate. Use the built-in level on the Honeywell backplate or a separate bubble level. If mounting to drywall, use the included anchors. If you hit a stud, wood screws work fine. Drill pilot holes to prevent cracking the drywall or splitting the stud.
-
Connect the wires. Push each labeled wire into its matching terminal on the Honeywell backplate. The terminals use a push-in design, strip about 1/4 inch of insulation, insert the wire, and it locks in place. Tug gently to confirm a solid connection.
-
Attach the thermostat and restore power. Snap the thermostat onto the backplate, then flip the breaker back on. The thermostat should light up and run a startup sequence.
-
Configure the system settings. The Honeywell will prompt you to select your system type (gas furnace, heat pump, etc.), number of heating/cooling stages, and whether you have accessories like a humidifier. Answer honestly, incorrect settings can cause short-cycling or lockouts. Consult your furnace manual if you’re unsure.
-
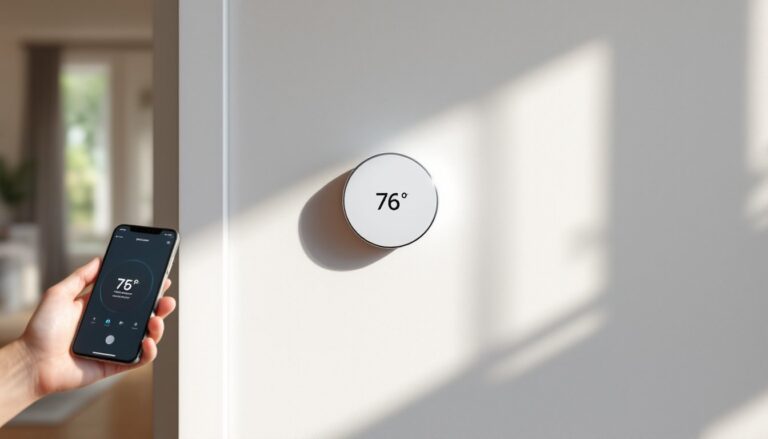
Connect to Wi-Fi and the app. Follow the on-screen prompts to join your home network. Download the Resideo app (iOS/Android), create an account, and add your thermostat by scanning the QR code on the backplate or entering the MAC address.
Safety note: If your system uses high-voltage wiring (240V for electric baseboard heat or line-voltage thermostats), hire a licensed electrician. These systems require different thermostats and involve serious shock risk.
Permit requirements: In most jurisdictions, replacing a thermostat is considered maintenance and doesn’t require a permit. But, if you’re adding a C-wire that involves new wiring at the furnace or running cable through walls, local codes may require a permit and inspection. Check with your building department.
Maximizing Energy Savings With Your Honeywell Thermostat
A smart thermostat only saves money if you use it right. Out of the box, most Honeywell models load generic schedules that may not match your household. Here’s how to optimize performance.
Set realistic setbacks. The EPA and Department of Energy recommend an 8-hour setback of 7-10°F during sleep or work hours. For heating, that might mean 68°F when home, 60°F overnight. For cooling, try 78°F when home, 85°F when away. Larger setbacks save more, but avoid extreme swings (like setting heat to 55°F) that force your system to run continuously catching up.
Use geofencing wisely. Honeywell’s geofencing switches to Away mode when your phone leaves a set radius (typically 0.5-7 miles). Enable it in the Resideo app, but adjust the radius so the system doesn’t switch modes during a quick errand. If multiple people live in the home, link all smartphones so the system stays in Home mode until the last person leaves.
Place room sensors strategically. If you have a T9 or T10 with sensors, put them in rooms you occupy most: bedrooms at night, home office during work hours, living room in the evening. Place sensors on dressers, shelves, or nightstands, not in direct sunlight, near vents, or inside closets. In the app, set “Focus” mode to prioritize specific sensors during certain schedule periods.
Enable adaptive recovery. This feature (sometimes called “smart response”) learns how long your system takes to reach target temperature and starts heating or cooling early so the home hits 68°F exactly at 6:00 AM instead of starting the climb at 6:00 AM. It’s subtle but trims runtime.
Check the filter reminder. Honeywell thermostats can remind you to change your HVAC filter every 30-90 days (you set the interval). A clogged filter reduces airflow, forces the blower to work harder, and can cut efficiency by 5-15%. Mark your calendar or set up the reminder, it’s the cheapest maintenance task with the biggest return.
Review energy reports monthly. The Resideo app provides a monthly breakdown of runtime by heating, cooling, and fan. If you see a sudden spike, investigate: maybe a door was left open, insulation settled in the attic, or a duct came loose. Catching problems early prevents waste.
Fine-tune for your climate. In humid regions, consider enabling the dehumidification feature (if your system supports it) to improve comfort without over-cooling. In dry climates, humidification during winter can let you lower the thermostat a degree or two while maintaining comfort.
Real-world savings vary widely, a well-insulated home in a mild climate might see 10% annual savings, while a leaky house in a harsh climate could hit 20%. Track your utility bills over a full year to measure actual impact.
Conclusion
Honeywell smart thermostats deliver measurable savings and comfort improvements for homes willing to invest the upfront cost and installation time. The T9 offers advanced room sensor control for complex layouts, while the T6 Pro provides contractor-grade reliability at a lower price. Installation is manageable for most DIYers, especially if a C-wire is already present. Once running, focus on realistic setbacks, geofencing, and regular filter changes to capture the full efficiency potential. A smart thermostat won’t fix poor insulation or an aging furnace, but it gives you the control to make the most of what you have.